Counter Pressure Bottle Filling or Painting Your House With Beer by Wes Woods
Some of you saw my demonstration of bottle filling at the July meeting. Interestingly Buck Wycoff was there and said he did the same demonstration years and years ago. It was great to witness a new generation of Foam Rangers seeing this process for the first time. The following is a description of the bottling process as demonstrated on that hot July night. Many porters were bottled, some were capped, most were drunk on the spot.
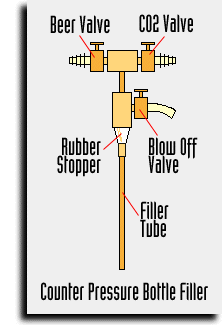
The idea of counter pressure bottle filling is to put your already carbonated and kegged beer into a bottle without having the bottle 80% full of foam. Also, the process allows a minimum of oxygen to contact the beer. Since the beer is cold it will readily absorb oxygen from the air. Refer to the figure of the filler. The device has two valved inlets. One for beer and one for CO2. Now the beer is coming from a keg (duh) and the CO2 it taped off the same line that goes to the keg. A pressure of 5 to 10 psi is good. If you get good you can go up to 15 psi. Speed is the only thing you gain typically. But you stand a better chance of painting you house too. The filler tube should reach to about 1" from the bottom of the bottle. This is adjustable but I have found that a 2" gap doesn't cause too much trouble. Just a little more foam.
The process: - You must clean and sterilize everything that will come into contact with the beer. Bottles, caps, filler, hoses, and fittings.
- Put the filler into the bottle until the stopper seats. Hold it down very firmly. You will use your strength to oppose the pressure trying to blow the filler out of the bottle.
- With all valves closed first open the CO2 inlet.
- Crack open the blow off valve for a few seconds to vent the air out of the bottle. Then close it.
- Close the CO2 and blow off valves and then open the beer valve all the way. Did I say hold the filler down? Well keep holding the filler down.
- Again crack open the blow off valve. The beer will start to flow. You can adjust the speed of beer flow by this valve. Stop when the bottle is as full as you want it to be.
- Very important! Shut off the beer valve. Don't let up on the filler. It can still blow out.
- Again crack the blow off valve to relieve the pressure.
- Pull out the filler and move the bottle over to the capper.
- Now you want foam to rise up to the cap just as you seat the cap. You might need to bang on the bottle (firm but gentle) with a metal tool. That starts the foam. Then cap it.
So, these are my steps. I didn't read the instructions when I got with the filler. I still don't know what they say. Now step 6 is the actual filling step. I feel that this step is the only place where there can be waste. If the beer foams up in the bottle then the foam will go through the blow off valve and out the blow off tube. That's OK. I find that even a lot of foam is almost no beer. Just put a glass under the blow off tube. Ordinarily foam from 30-40 bottles might fill a glass. I immediately use any settled foam for medicinal purposes only.
|
More Tips
Great Beer
Stores
Recipes
BJCP Styles
|


